Creating custom line breaks gives you full control over how the headlines or paragraphs look like on your website. In this post, we will see how to create and remove line breaks on tablet and mobile devices in Elementor and CSS.
Using line breaks can be an effective way of organizing your text to make it look more impactful, visually appealing and legible. Line break means simply splitting a line of text into two lines without actually creating a new paragraph. Take a look at this example from this website’s homepage where I’ve used line breaks to organize the main paragraph of text in the way I want:

However, sometimes you want these line breaks to appear only on desktop and you want to hide them on tablet and mobile to avoid unwanted breaks inside of paragraph when viewed on smaller screens. Let’s see how to create line breaks in Elementor and how to make them appear only on certain devices.
Check the video below or continue reading!
*This post may contain affiliate links. If you click on a link and make a purchase, I will receive a commission from the sale, with no extra cost to you. That way you are supporting my blog and allowing me to keep making videos and posts like this. I only promote products that I use, have experience with and support, such as Elementor Pro.
How to create a line break in Elementor
To create a line break (not a paragraph break), when you place a text editor in Elementor, all you need to do is click ‘Shift+Enter’ where you want your line break to appear. This will break the text and create a separate line, but still treat those lines as part of the same paragraph.
How to remove a line break in Elementor and CSS on tablet or mobile
When you create a line break using ‘Shift+Enter’, there is a so-called ‘br’ tag that gets automatically inserted in the code. In order to remove it, you simply need to hide this tag and target the devices or screen widths where you want to hide it.
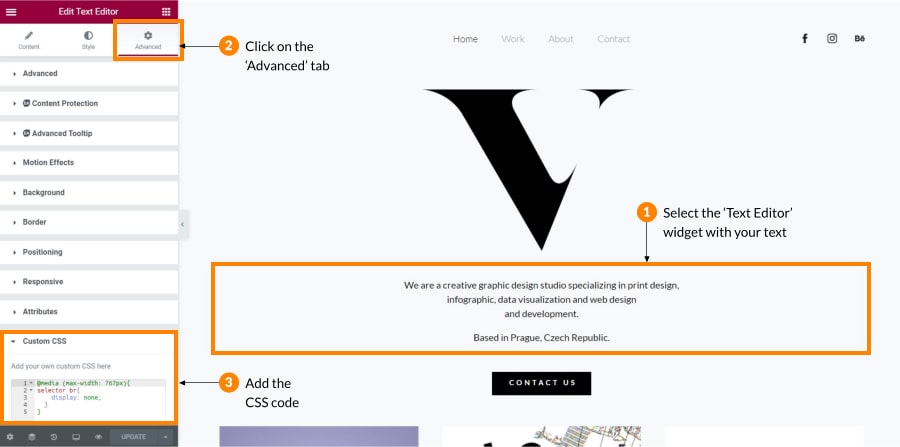
If you have Elementor Pro version (paid one), you can do this simply by :
- Clicking on the text editor
- Going to the ‘Advanced’ tab under Custom CSS field
- Target the media that you want to apply this change to
- Hide the ‘br’ tag using ‘display: none‘. Don’t forget to include the ‘selector’ tag to tell Elementor to apply this styling to the element you selected. Finally, in order to apply this hiding property to the ‘br’ tag, simply add ‘br’ after selector. So the code might look like this:
@media (max-width: 1023px){
  selector br{
  display: none;
  }
}
*This post may contain affiliate links. If you click on a link and make a purchase, I will receive a commission from the sale, with no extra cost to you. That way you are supporting my blog and allowing me to keep making videos and posts like this. I only promote products that I use, have experience with and support, such as Elementor Pro.
To do this in Elementor free version, you can use the same principle. However, since there is no Custom CSS field, you would need to insert the code through a plugin. Simple custom CSS and JS plugin will do the trick. After this, instead of selector, you can use the class name that the element belongs to. For example, if you have assigned the class ‘body-copy’ to your text in Elementor, use this class to apply ‘display: none’ property to its ‘br’ tag. Don’t forget to keep the @media part of the code to target the mobile and tablet devices only! And of course to call out the class with a ‘.’ in front of its name.
@media (max-width: 1023px){
  .body-copy br{
  display: none;
  }
}
You can apply the same principle if you assigned an ID to your element, not a class.
Alternatively, if you don’t want to apply these changes to a global class in CSS, you can simply target the specific element and apply these changes just to this single element, instead of the entire class. In order to target it, you can use Inspect element feature.
That’s it! Now you can have full control over how your most important text and messages look like across all devices.
*This post may contain affiliate links. If you click on a link and make a purchase, I will receive a commission from the sale, with no extra cost to you. That way you are supporting my blog and allowing me to keep making videos and posts like this. I only promote products that I use, have experience with and support, such as Elementor Pro.