In this post, we will cover how to insert an inline image or graphics using Elementor and some simple CSS.
Check this video on how to create just that or continue reading below!
*This post may contain affiliate links. If you click on a link and make a purchase, I will receive a commission from the sale, with no extra cost to you. That way you are supporting my blog and allowing me to keep making videos and posts like this. I only promote products that I use, have experience with and support, such as Elementor Pro.
Let’s say that you want to add an emoji, logo or any other image inside your text or paragraph. Here are the steps on how to achieve that:
Insert your text using a text editor widget in Elementor
First, use a text editor widget and insert your text. Switch to the ‘Text’ tab of the widget and use the CSS to insert and specify the source of an image. This image can be hosted anywhere on your website or using any other online link. You now need to style this image and assign the correct size, position and properties.
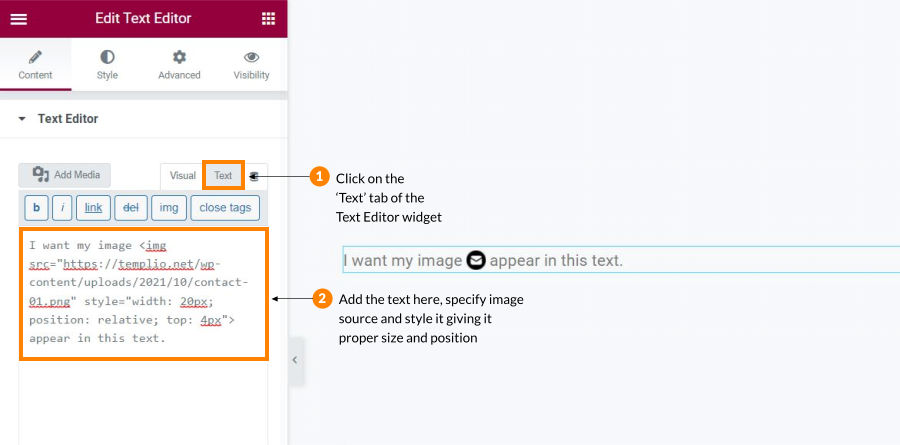
Style your linked image in the ‘text’ tab
Type in ‘style’ where you can add all the properties: the width, ‘position: relative’ and specify this position using the ‘top’ property for example to align the image with the text properly. Then use some margins on the left and right side if needed. Play with these values to give it the correct parameters and make it pretty.
The final code could look something like this:
I want my image <img src="https://templio.net/wp-content/uploads/2021/10/contact-01.png" style="width: 20px; position: relative; top: 4px;"> to appear in this text.*This post may contain affiliate links. If you click on a link and make a purchase, I will receive a commission from the sale, with no extra cost to you. That way you are supporting my blog and allowing me to keep making videos and posts like this. I only promote products that I use, have experience with and support, such as Elementor Pro.
*This post may contain affiliate links. If you click on a link and make a purchase, I will receive a commission from the sale, with no extra cost to you. That way you are supporting my blog and allowing me to keep making videos and posts like this. I only promote products that I use, have experience with and support, such as Elementor Pro.