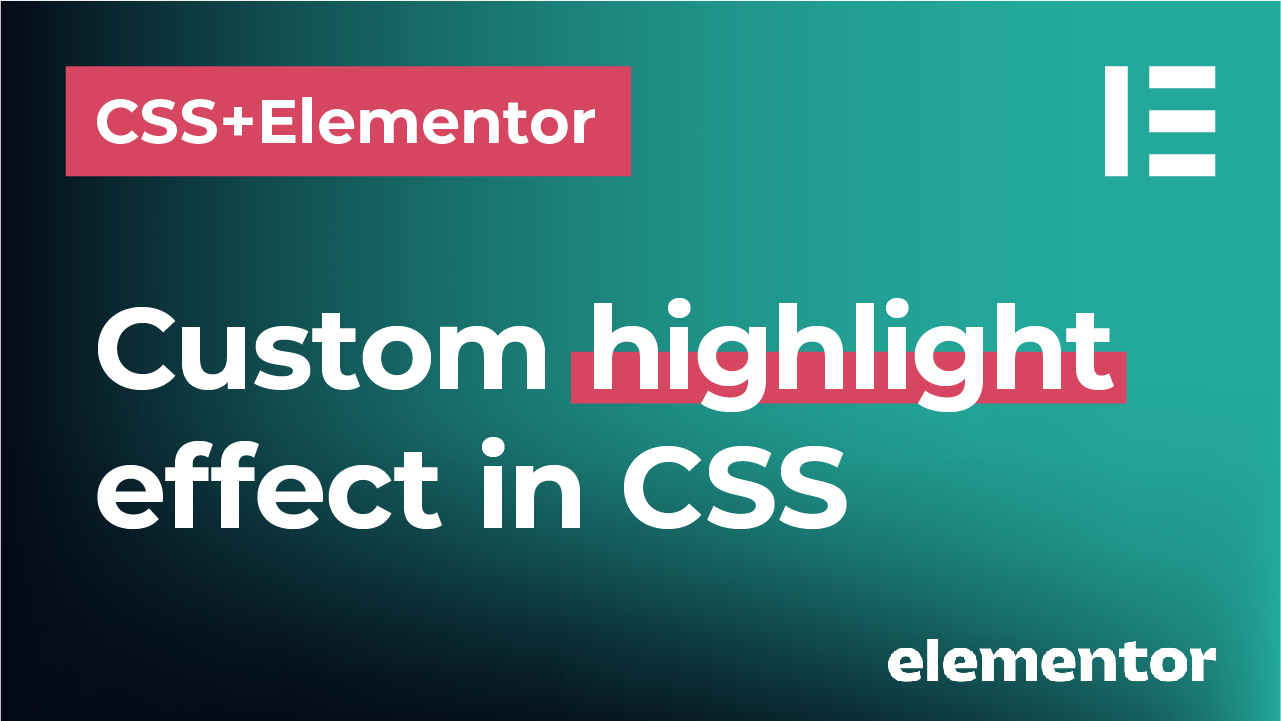
In this tutorial, you will learn two simple ways how to make a custom highlight text effect in CSS and Elementor. You may find this highlight or marker effect to be quite popular on modern websites, especially when using pastel, light colors to create a thick line behind the text. Something like this:

Check the video below or continue reading this post!
I will show you two different ways how to create this effect. The first one is using gradient background and the second one is using so called “before” pseudoelement. Both ways are using “span” tags to target a specific word to highlight. So, let’s see how to do this!
First way: using gradient backgrounds
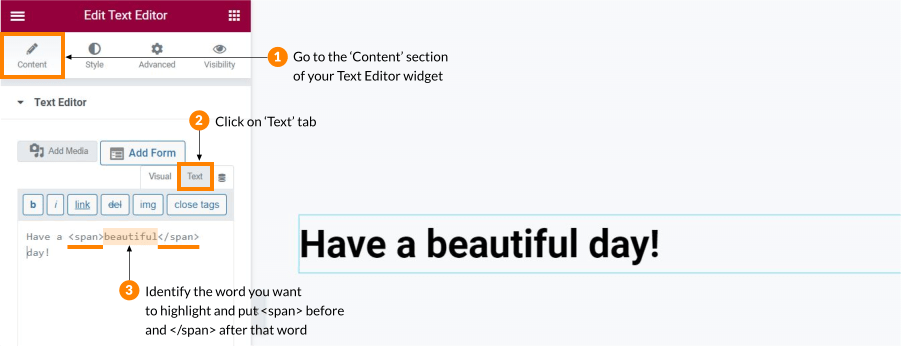
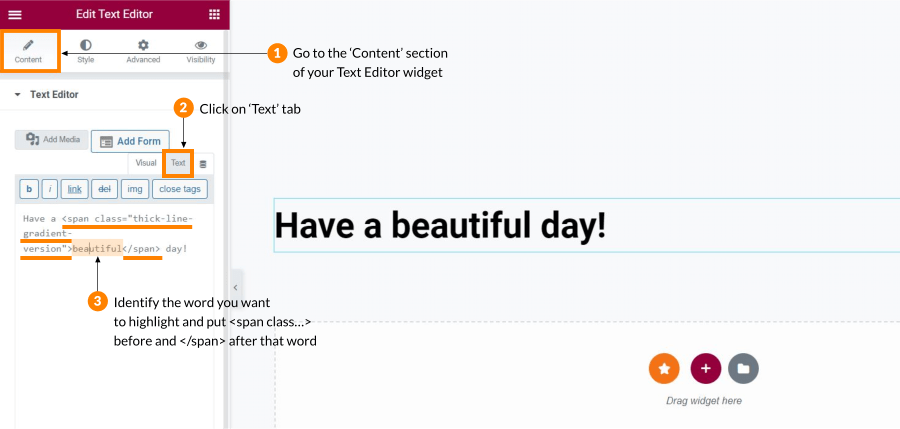
First, use a ‘Text editor’ widget to insert your text. Then head over to the ‘Content’ section of the widget and switch to ‘Text’ tab (not ‘Visual’). We will be adding the ‘span’ tags here in order to identify and apply this effect to a specific word. Let’s say that we want to highlight the word ‘beautiful’. We will then put <span> before that word and </span> tag after that word.
The overall code would look like this:
Have a <span>beautiful</span> day!Adding the CSS code
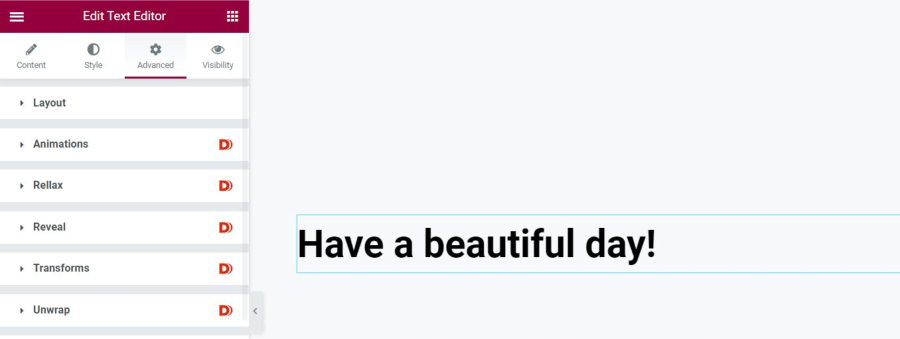
Now is the time to add CSS code and create the highlight effect. I am using Elementor Pro, so I will be adding this CSS code directly to my widget. However, if you are using a free Elementor version, I will show you how to achieve the same effect and add the code at the end of this post.

If you are using Elementor Pro version, go to the ‘Advanced’ tab of your Text Editor widget and scroll down to ‘Custom CSS’ field. We will add our CSS code here.
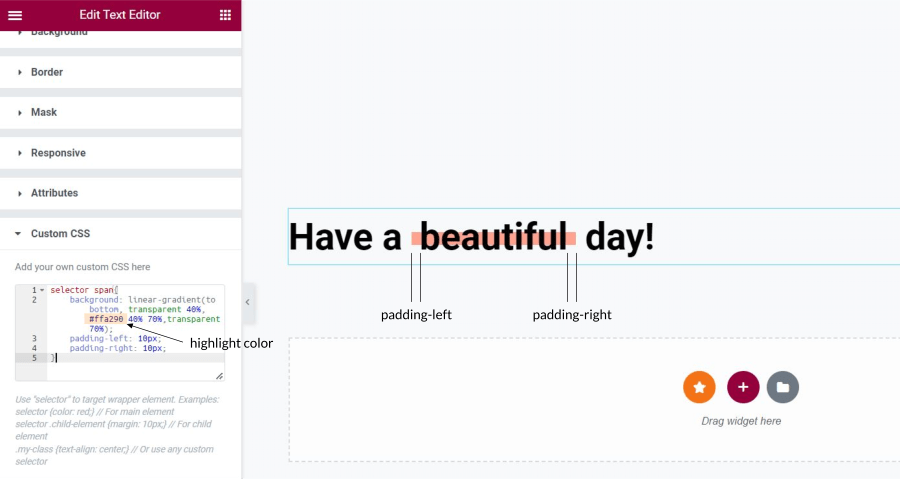
Now, in this ‘Custom CSS’ field, you can insert the following code:
selector span{
    background: linear-gradient(to bottom, transparent 40%, #ffa290 40% 70%,transparent 70%);
    padding-left: 10px;
    padding-right: 10px;
}
Let’s see what each of these lines means.
First, we want to use ‘selector’ to apply this code to our text editor. Then we type ‘span’ because we want to apply this code ONLY to our selected text, which is ‘beautiful’ and which we wrapped in ‘span’ tags in the previous step.
Then, we are using gradient background to create a highlight effect. You might wonder what does a gradient have to do with a simple line? Well, what we are doing is that we are creating a gradient WITH A HARD BREAK. That gradient goes from fully transparent to a color we want and then back to the fully transparent color. But the color transitions will not be smooth as you typically do with gradients, but they will be with a hard break which will create an illusion of a line.
The percentages 40% and 70% in the code above mean where the line starts and where it ends vertically speaking and going from the top to the bottom. The transparent color starts at the very top and ends at 40%, the background color #ffa290 starts at 40% from the top and ends at 70% from the top and then it switches again to a fully transparent color. So if you put 20% instead of 40%, the line will start closer to the top. And if you put 80% instead of 70% it will end closer to the bottom.
The very last thing we can control is the padding on the left and right side which influences how much the line goes outside of the word or text itself.
Here is the final result in Elementor:
The second way: using “before” pseudoelement
Now, the second way is actually the way I prefer to use to create this highlight text effect. It is using a ‘before’ pseudoelement and it simply creates a bit cleaner code in my opinion. It also enables you to control precisely the thickness of the line in pixels as opposed to gradient percentages.
Start by again defining the span tags in your Text editor widget, just like for the first version:
Again, go the ‘Advanced’ panel and ‘Custom CSS’ field to insert your CSS code.
We will start by inserting this CSS code to begin with:
selector span::before{
    content: '';
    left: -5px;
    right: -5px;
    background: #ffa290;
    position: absolute;
    height: 20px;
}
Here is how this looks like with these few lines of code:

Before we fix this, let’s see what that CSS code above actually does.
First, we used the same ‘span‘ tag to target our word ‘beautiful’, but this time we added “::before” pseudoelement. Then, we put and empty content to this and applied a few more lines of code. Such as background with our color and most importanly height. This height will specify the thickness of our line in pixels.
You can play with ‘left‘ and ‘right‘ values and set them to negative if needed to achieve the left and right padding effect.
Lastly, we want to type “position: absolute” in order to make this effect work.
Now, we do want our line to go BEHIND the text, not on top of it.
In order to make the line behind the text, we will set the “z-index” to negative value. And we also want that line to be slightly shifted and moved from the top to the bottom. For that, we will use the “top” value.
So we will be adding these two lines to our code above:
z-index: -1;
top: 20px;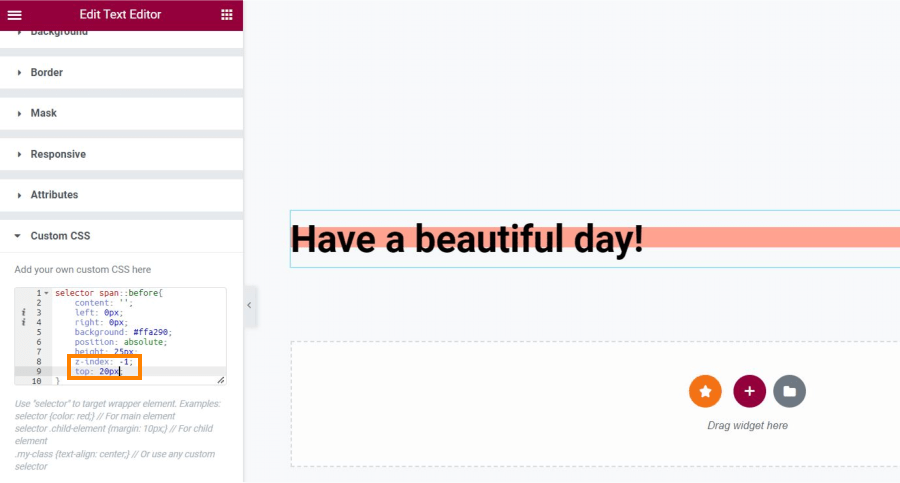
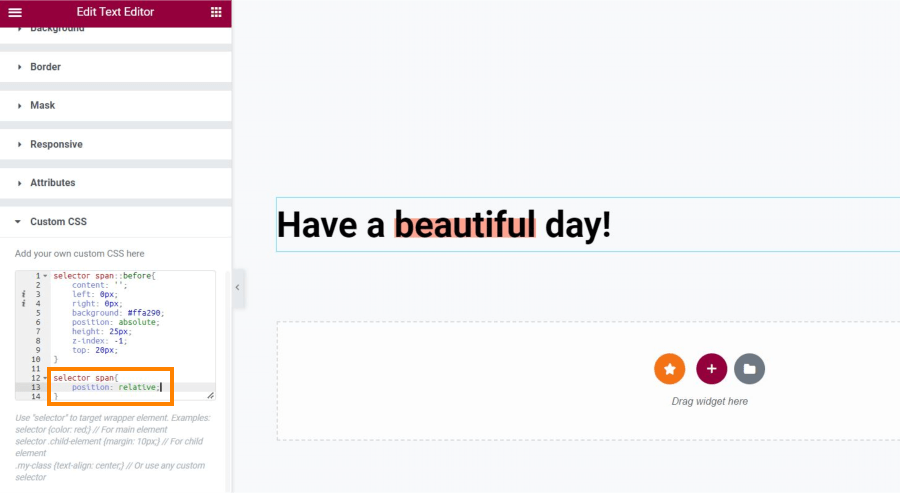
Lastly, our line is not yet applying to just our word ‘beautiful’, but to the whole text. If we want to highlight just the word ‘beautiful’, not the entire paragraph, we will need to apply the ‘position: relative‘ to our span, but without the ‘before’ pseudoelement.
We will add the code below to our ‘Custom CSS’ field:
selector span{
    position: relative;
}
The final CSS code with all the lines we added will look like this now:
selector span::before{
    content: '';
    left: -5px;
    right: -5px;
    background: #ffa290;
    position: absolute;
    height: 20px;
    z-index: -1;
    top: 20px;
}

selector span{
    position: relative;
}
How to create highlight text effect with Elementor FREE version
If you are not using Elementor Pro, but a free version, you can use the same CSS code to get the same result. I am using a Simple Custom CSS and JS plugin to insert my custom CSS code.
You can check one of my previous posts on best WordPress plugins featuring this CSS plugin as well.
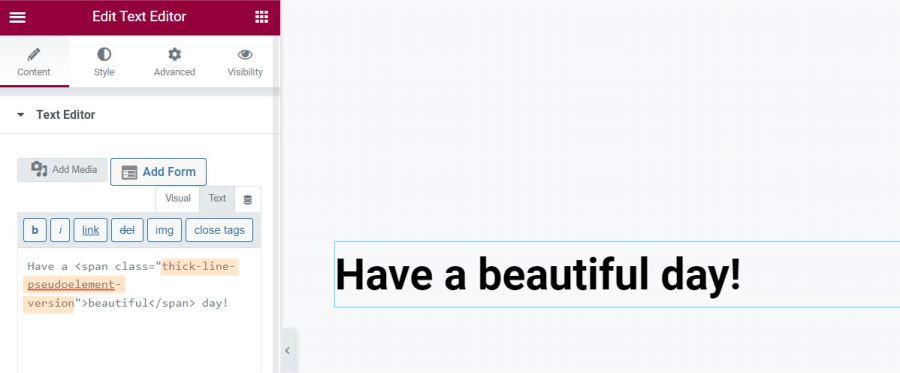
Once you install and activate the plugin, go to your text editor widget and again, switch to the ‘Text’ tab.
Then target the word you want to highlight and put span tags before and after this word, but this time with the ‘class’. So you can write something like this:
Have a <span class="thick-line-gradient-version">beautiful</span> day!You can name your class however you want, but with no spaces!
Remember this class name and head over to the CSS editor in your plugin. Then add basically the same code we used before.
For the first version with the gradient, we will type the following CSS code:
.thick-line-gradient-version{
    background: linear-gradient(to bottom, transparent 40%, #ffa290 40% 70%,transparent 70%);
    padding-left: 10px;
    padding-right: 10px;
}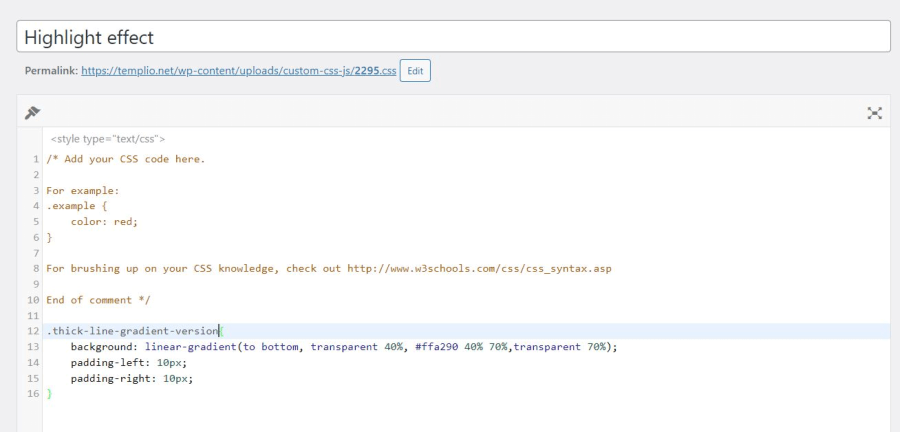
Note that the code itself is EXACTLY the same like in the Elementor Pro version. The only difference is that instead of writing ‘selector’, we have to write the class name (in our case “.thick-line-gradient-version”)
If you are using the second version with pseudoelement “before”, the steps are the same. Just this time, we will call our class differently.
This is what we typed this time:
Have a <span class="thick-line-pseudoelement-version">beautiful</span> day!Then again, we want to go to our CSS editor and add the following code:
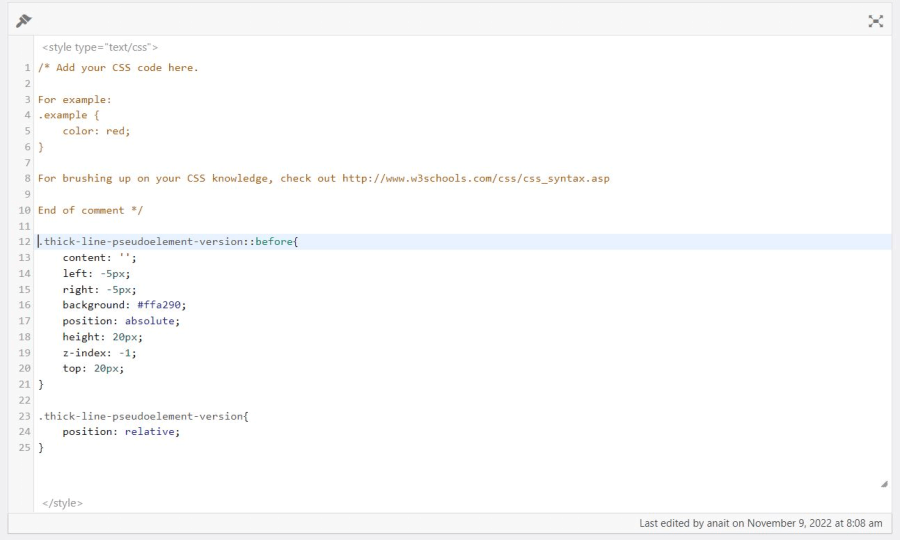
.thick-line-pseudoelement-version::before{
    content: '';
    left: -5px;
    right: -5px;
    background: #ffa290;
    position: absolute;
    height: 20px;
    z-index: -1;
    top: 20px;
}

.thick-line-pseudoelement-version{
    position: relative;
}
You can see that it is again the EXACT same code we used before, just without the ‘selector’ and with class name instead (in our case, “.thick-line-pseudoelement-version”). We also don’t need the ‘span’ tags either because we already set the whole class to our span!
That’s it!
This is how our final effect looks like:
Now you can go ahead and apply this custom highlight effect to any parts of your text!
*This post may contain affiliate links. If you click on a link and make a purchase, I will receive a commission from the sale, with no extra cost to you. That way you are supporting my blog and allowing me to keep making videos and posts like this. I only promote products that I use, have experience with and support, such as Elementor Pro.